I really enjoying creating gifts for people for Christmas, and I have a tendency to do something like this every year. I usually learn a lot (especially about my patience!) People tend to enjoy these gifts and it also helps my bank account.
ENJOY!
Chalkboard Wine Glasses
 |
| $9.99 for 12 glasses from Bed Bath and Beyond (don't forget about the 20% off coupon!) |
 |
| A bit of a shorter stem than what I wanted, but they worked out great! |
 |
| Chalkboard paint - $14.99 at Lowe's. A little more $$ than expected, but I am sure I can find somewhere around the house to use the rest of it! :) |
 |
| I added scotch tape at the base to give a cut off point. I'm sure painting tape would work well too. *note: make sure to flag the tape so it's easy to peel off. It was difficult to get the paint to lay smoothly on the glass. I had to make the paint relatively thick to do so. |
 |
| Finished product... didn't have a picture of the brush I used, but it was a 1" standard brush $1.49 from Lowe's. |
 |
| Drying on 2 pieces of skinny wood so they wouldn't stick to the newspaper. |
$9.99 wine glasses
$14.99 paint
+ $1.49 brush
$26.47
Used for 6 different people: $26.47/6 = $4.41/person
I also used chalk to write 'Merry Christmas' on each of them and was going to include a piece of chalk with each glass... that is until my lovely dog decided to eat the chalk. (Non-toxic, I looked it up - thankfully she didn't have any reactions)
Funky Coasters
 |
| 4x4 white bathroom tiles purchased at Lowe's. $.17 each - so naturally I bought a box of 80. $13.60 total |
 |
| I used Mod Podge ($8.99 at Michael's) and this Polycrylic finish (free from Mike's neighbor). I purchased a can of clear enamel spray paint to cover them, but didn't like the finish it left. I'd recommend this finish. |
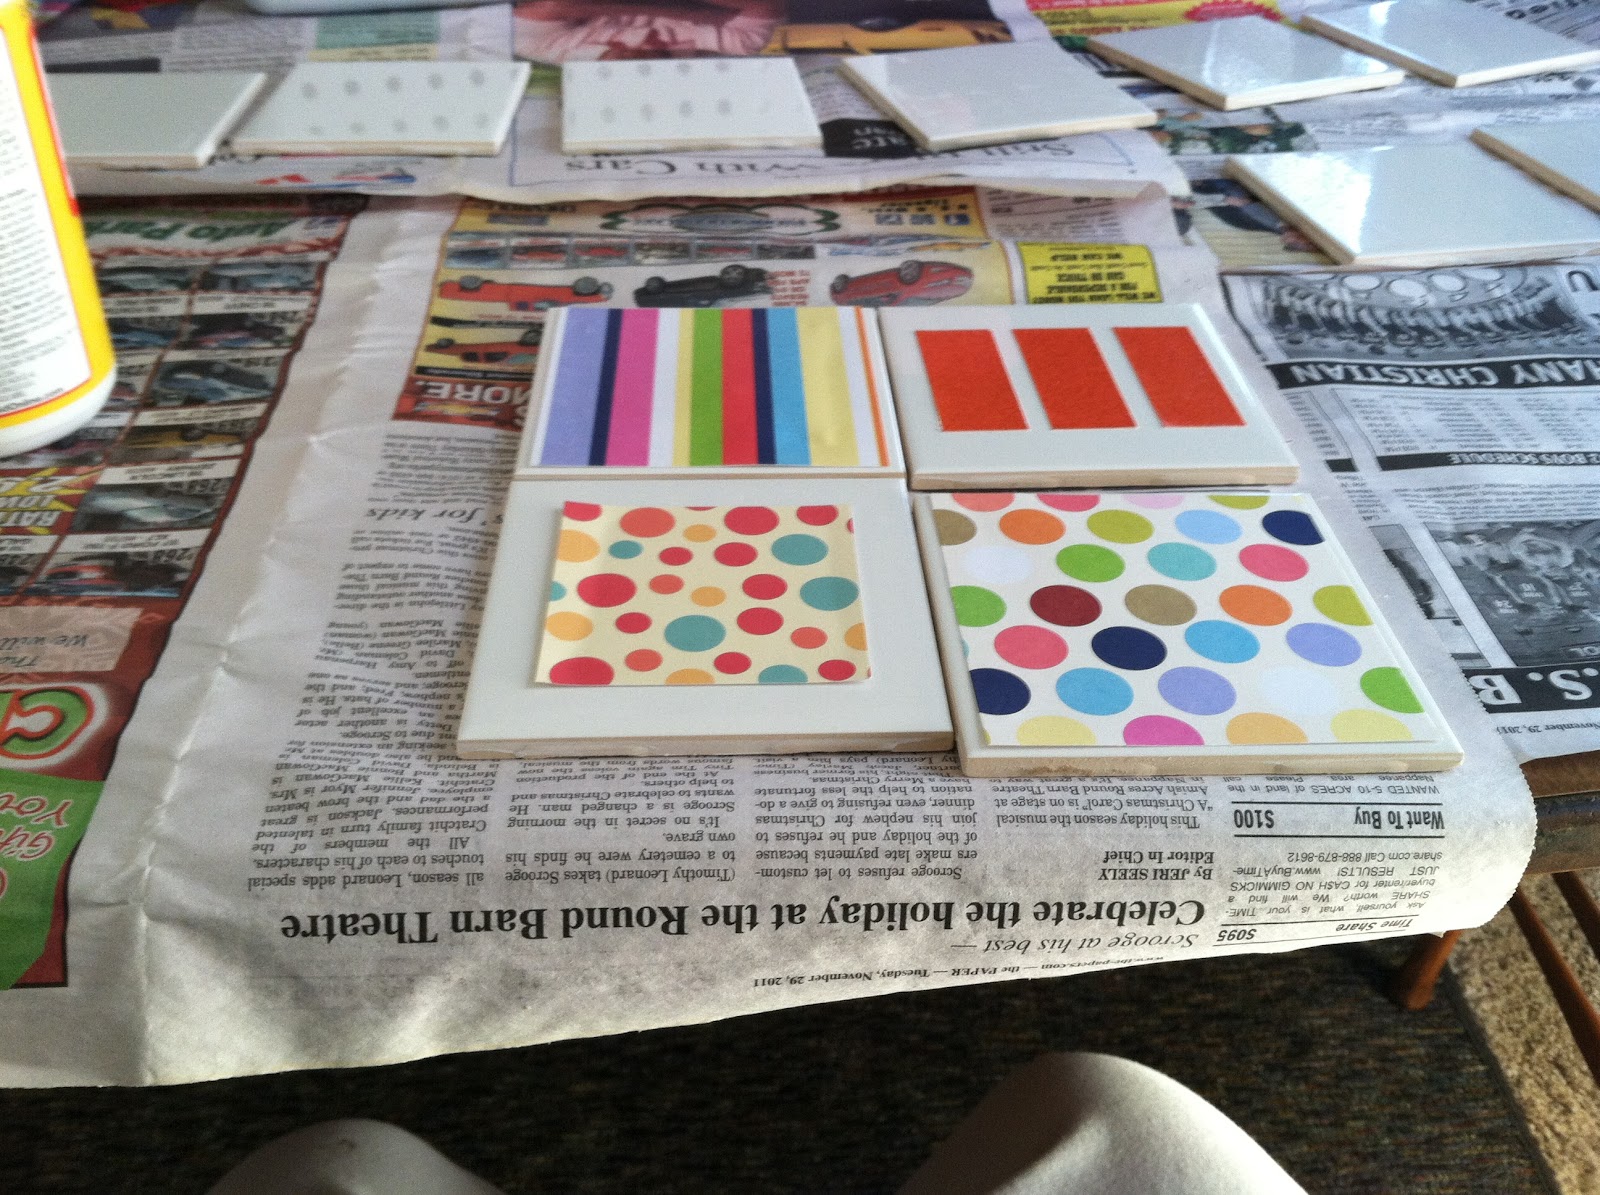 |
| I purchased (and already owned) a variety of scrapbook paper - it's super cheap! I cut the paper into 4x4 and 3x3 squares. *I experiemented with the 1in. strips but didn't like how they looked! |
 |
| I applied a light coat of Mod Podge to the back of the paper square and the top of the tile to allow them to adhere. (Using a thick brush purchased at Lowe's for $1.89) I gently placed the paper onto the tile and then added another light coat of Mod Podge to the top of the paper. *This is where I came into some complications: This is the first time I have worked with Mod Podge before and it was a bit more challenging than I anticipated. This is what I learned: - It will look thick and not clear, but it dries clear - It is very important to smooth out all the bubbles that form - If you're getting bubbles, it's probably because you applied too much - Mod Podge dries VERY quickly... so make sure there is no dust (and especially dog hair) on the paper |
 |
| This is a picture of what they looked like after the Mod Podge was applied. |
 |
| And then came the lonnnggggggg drying process! While the Mod Podge dries pretty quickly, they needed to be firm before applying the Polycrylic sealer. |
 |
| I repeated this picture because I then covered each of them with this finish. Like the Mod Podge, this appears a frosty color, but it will dry clear. I put a moderate coat over each of the tiles. *The good thing about this finish is that there is almost no odor to it, so I was able to complete this in the house. I tried the enamel spray and had to do this outside in the garage - which was a daunting task in the 32 degree rainy/windy day. |
 |
| Yet again.... the drying process!!!! These took a long time to dry. I let them dry for a full 24 hours (some on the ground, some on newspaper, and some on the wood racks you saw with the wine glasses) |
 |
| Finished product! I bought 2 packages of bumpers from Walmart ($8.99/package) and added them to the bottom 4 corners. I also added a little orange square in the bottom as my "signature" :)
I found this to be a really fun, challenging project! I liked that I could personalize the coasters for each person's taste. I made packages of 4 for most people, but made some individual ones for people to bring to work if desired. (bandaid coasters for my co-workers, grass coasters for my brother who designs turf fields...)
|
$13.60 tiles (and I have some left over)
$8.99 Mod Podge (from Michael's)
$1.89 wide paint brush (from Lowe's)
+ $17.98 bumpers (from Walmart)
$42.46
While $42.26 isn't "cheap"... I used these for gifts for 12 people making the average cost per gift $3.52... not too shabby!!!
side note: if you are reading this - and a recepient of these gifts - don't pay attention to the cost, it was the love that went into the process that really matters :)
No comments:
Post a Comment